Requirements
- Mosh-Pro requires Windows (7 or later, 64 bit) or macOS (12 or later). Mosh-Pro is Apple M1 Silicon compatible.
- Export render size is limited to 4096 x 4096 pixels or smaller.
- Render times are dependent on GPU speed, export size, duration and frame rate.
Installation
- Upon purchase you will be sent a receipt email with your download link and license key. Save this email as you will need the download link for future upgrades.
- Click the ‘Download Mosh-Pro’ button in the receipt email to view your download link.
- To install, download and unzip the zip file then:
- Windows: Double-click the ‘Mosh-Pro Setup.exe’ file to run the installer.
- macOS: Double-click the ‘Mosh-Pro.dmg’ file, then drag the Mosh-Pro app icon to your Applications folder.
- The first time you run Mosh-Pro you will be asked to enter your license key. Your license key can be found in the receipt email that you received on purchase. Internet connection is required for one-time registration.
- Mosh-Pro may be installed on up to 3 devices for each license.
- To install on macOS, ensure you have ‘Allow apps downloaded from App Store and identified developers’ selected in ‘System Preferences’ -> ‘Security and Privacy’.
How To Upgrade
- To upgrade to the latest version, re-download your files and re-install the app.
- To download your files, click the ‘Download Mosh-Pro’ button in your original purchase receipt email (search for “Mosh”). Or login to gumroad.com to access your files.
- Your license information and presets will be retained when upgrading.
- Note that some presets may need to be updated when upgrading to a new version.
- Upgrades are free within the same major version number.
Managing Subscriptions
- If you cancel your Mosh-Pro subscription you lose access to the application. Gumroad.com will email you a few days before your subscription renews if you want to cancel before renewal.
- You can restart a cancelled yearly subscription by clicking the ‘Download Mosh-Pro’ button in your original purchase receipt email (search for “Mosh”). Then click ‘Membership’ -> ‘Restart’. If you created an account at Gumroad.com, you can also find your membership details there. There is no charge for restarting a cancelled subscription.
Loading Media
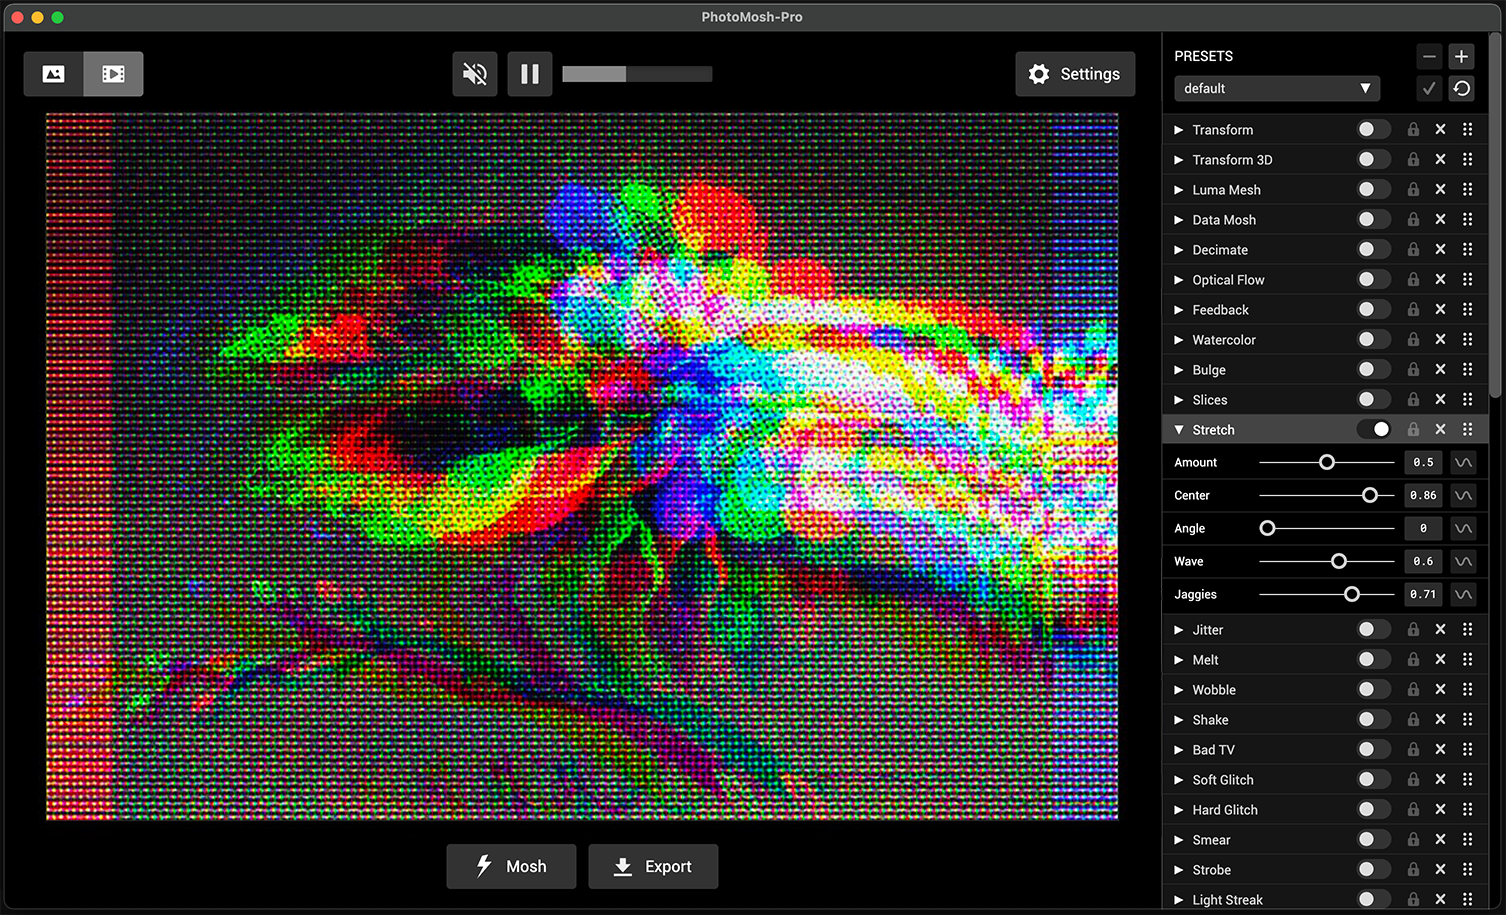
- Choose to load a file or use the Webcam. Supported input file types are: MP4, MOV, WEBM, AVI, MKV, M4V, GIF, PNG, JPG & WEBP.
- Load a new file at any time by dragging it onto the app.
- Click the ‘Mosh’ button to randomize Effects, or use the Effects panel at right to toggle Effects and modify parameters. Use Ctrl-Z to undo a Mosh.
- Click the ‘Export’ button to record and save media output. Output media is saved to the folder selected in Settings -> General -> Save To. By default this is the ‘Desktop’ folder.
- Use the application Main Menu for commonly used commands.
Top Menu

The top menu is spilt into 3 main sections:
- The top-left Output Mode button toggles between image output mode (JPG/PNG) or video output mode (MP4/WEBM/GIF).
- The center playback bar will show for video output mode. Use the playback button to play / pause and use the playback bar to skip around int the video.The Mute button will mute input video.
- Use the settings button to open the settings dialog.
- Tap the space bar to toggle playback.
Effects
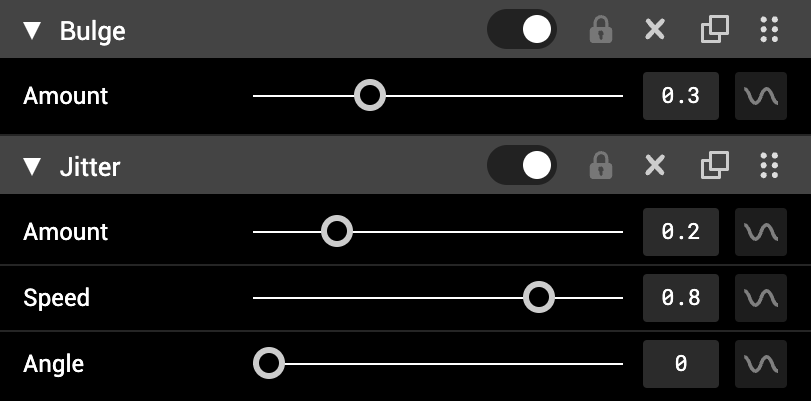
The Effects panel is where you dial in your effects. Effects are applied from top to bottom. Drag and drop effects to change the order.
- Each effect has the following buttons left to right:
- Expand the parameter panel with the triangular arrow button.
- Enable effects with the circular toggle button.
- Use the lock button to lock effects. Locked effects will not be modified when clicking the Mosh button.
- Remove effects with the X button.
- Duplicate button creates a duplicate of this effect directly below.
- Effects can be dragged with the 6 dots icon at right to change the order that effects are applied.
- Use Main Menu -> Effects to ‘Disable All Effects’, ‘Remove All Effects’, ‘Load Default Effects’ or ‘Randomize Effects Order’.
- Right click a Parameter Slider to reset to it’s default value.
- Select a slider numeric input to change value with scroll wheel or mouse drag.
- Right click an effect name to rename it.
Add Effects

Add new Effects by using the ‘ADD EFFECT’ panel at bottom of the Effects list. This allows you to stack multiple versions of the same effect.
Mask Effects
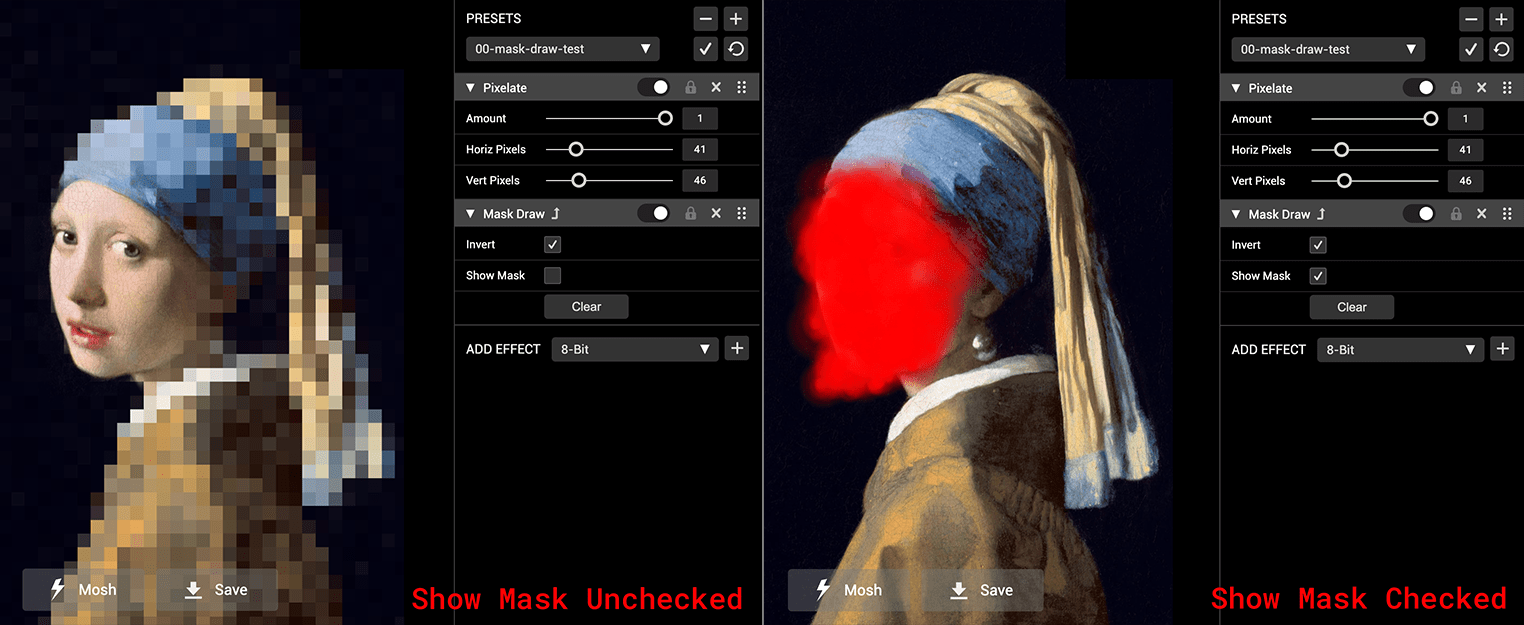
The 3 Mask effects (‘Mask’, ‘Mask Blocks’ and ‘Mask Draw’) can be used to show or hide effects in selected areas of the image. Mask Effects only mask the effect layer directly above. To mask multiple layers, add multiple Mask effects (Note you can duplicate a mask effect to duplicate it’s mask). Use the ‘Show Mask’ checkbox to view the current mask as red. Use the ‘Invert’ checkbox to flip the mask effect.
- ‘Mask Draw’ lets you draw the mask with the mouse directly in the preview area. Drawing slower gives a smaller brush size. Use the ‘Erase’ check box to erase and the ‘Clear’ button to clear the entire mask.
- ‘Mask’ lets you import an image file to use as a mask. The red channel of the image is used for the mask, so red or white is masked and black is not masked. Use ‘Invert’ to flip the mask.
- ‘Mask Blocks’ creates a random animated pixelated mask area.
Overlay Effect

The Overlay effect allows you to load additional images or videos as a new layer. Overlays are scaled to fit the preview window. Video overlays will be synced to the main timeline. Overlay layers are only affected by effects below them in the effect stack.
- Click the ‘Load’ button to select an image or video file.
- Set opacity, position, scale, and rotation angle with the sliders.
- Blend mode can be ‘normal’, ‘additive’, ‘multiply’, ‘screen’, ‘softlight’ or ‘difference’.
- Check ‘Repeat’ to repeat the overlay texture when scaling or moving.
- Check ‘Use Aspect Ratio’ to maintain the aspect ratio of the loaded media.
ChromaKey Effect
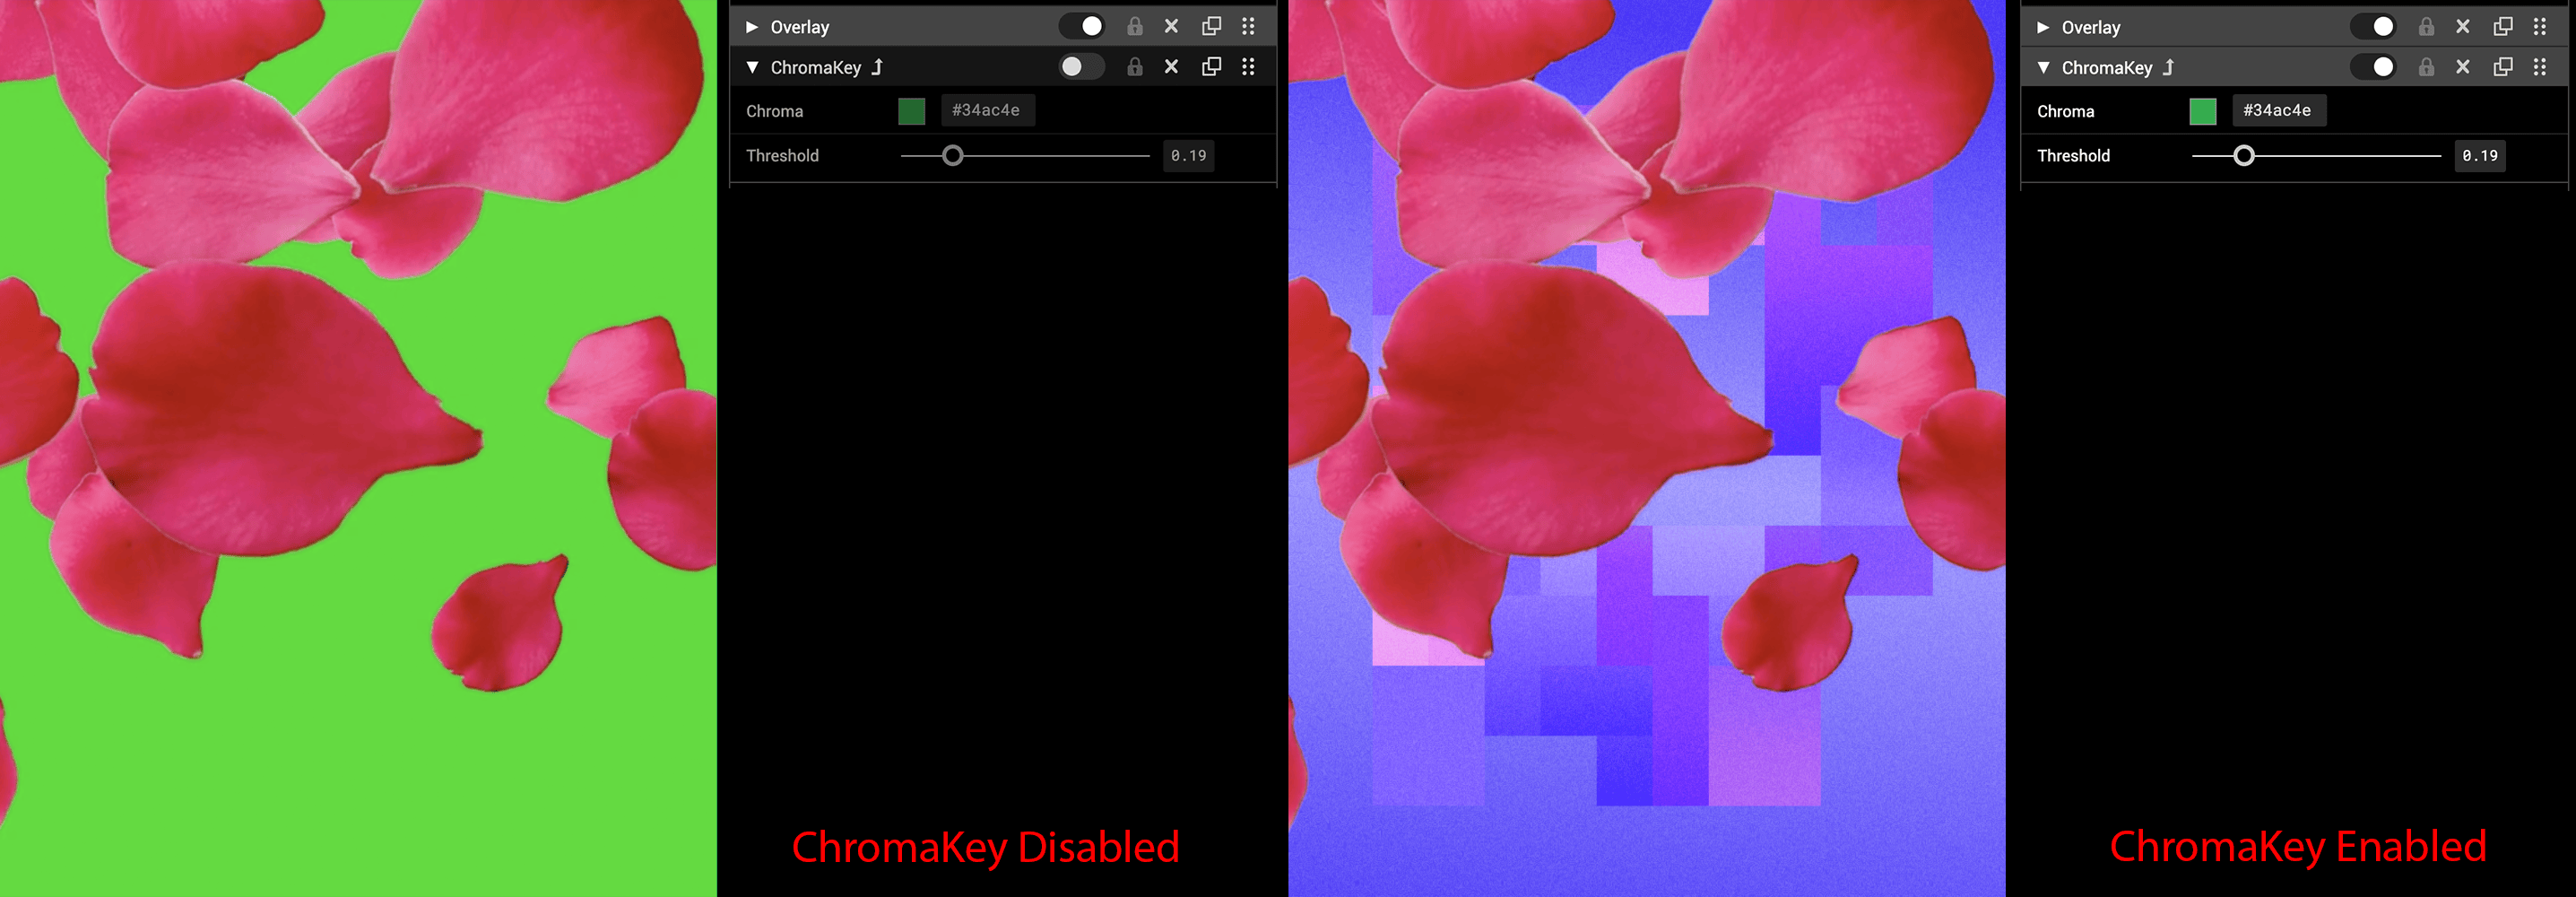
The ChromaKey effect allows you make a selected color transparent, for example to remove a green-screen background. ChromaKey can be applied to the input media or to an overlay layer. ChromaKey only applies to the layer directly above, or to the input media if it is the first effect.
Draw Effects

The 2 effects that use the cursor for drawing show an additional pen icon. This is to indicate which effect is currently enabled for drawing. The last effect clicked becomes the enabled effect. This prevent cursor drawing from drawing into multiple layers simultaneously.
Presets

Presets allow you to save and load favorite Effects combinations.
- Plus button - Create a new preset. Enter a preset name to create a new preset. Only enabled Effects are saved to the preset.
- Minus button - Delete selected preset.
- Check button - Update selected preset with current Effects settings.
- Revert button - Revert selected preset to last saved settings.
- Use Main Menu -> Presets -> Open Presets Folder. Open presets save folder in Finder/Explorer. This allows you to copy, export and import presets. Copy a preset file into the Preset Folder to import a preset.
- Use Main Menu -> Presets -> Next Preset and Previous Preset to switch between presets.
- Use Main Menu -> Presets -> Random Preset to randomly select a preset.
- To first 9 presets in the preset list can be selected via a key shortcut Cmd-#, where # is a number from 0 to 9. Cmd-0 loads the default preset as this is always the first preset in the list.
Preset Folders allow you to organize your presets into seperate folders.
- Click the ‘Folder plus’ icon to create a new Preset folder. Preset folders are saved as sub-folders inside the main preset folder.
- You can manually create folders and move presets using MacOS Finder or Windows Explorer. Mosh-Pro will pick up the new folder structure automatically.
Settings
The settings panel allows you to specify export settings, general settings and audio settings.
Export Settings
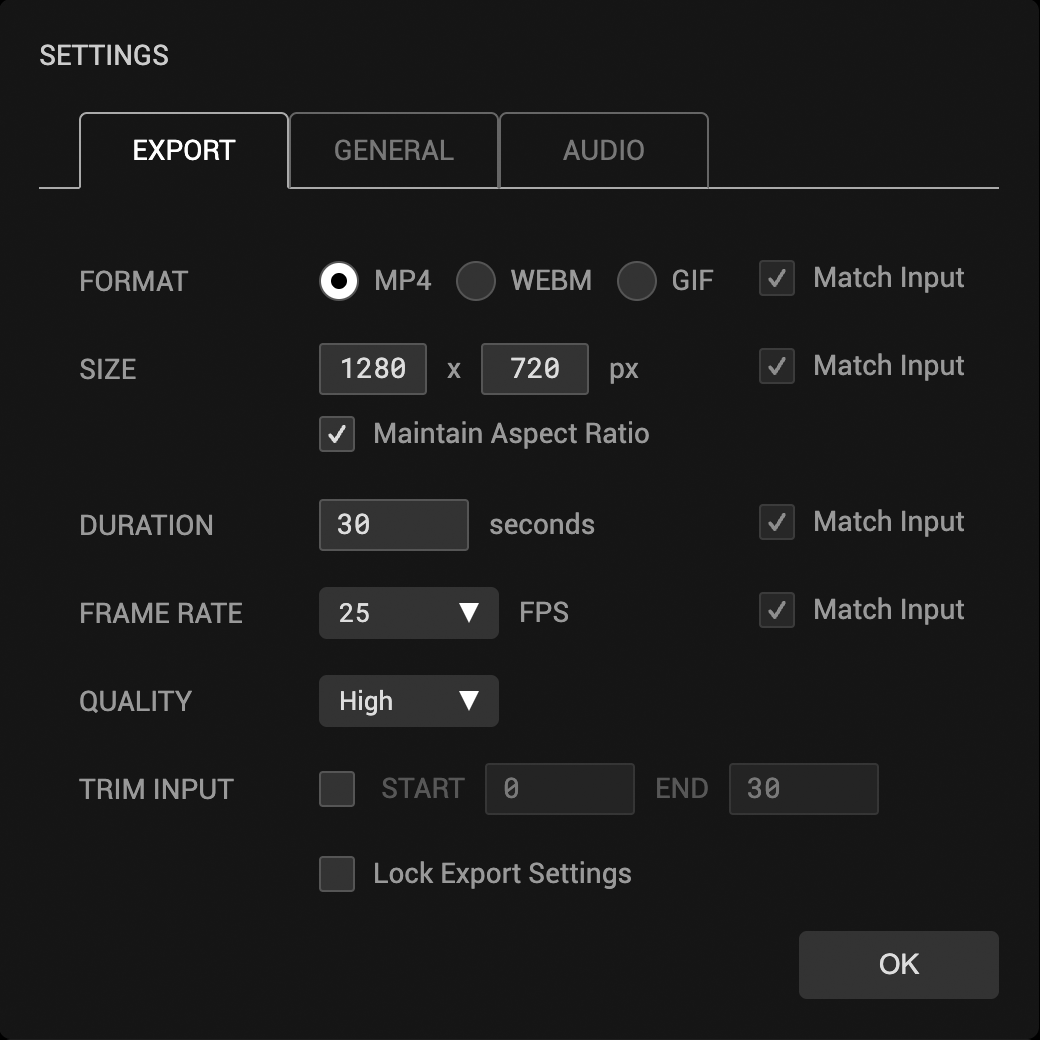
Export settings allow you to specify the media exported by Mosh-Pro.
The export settings panel will change based on if you are exporting as Image or Video. Use the top-left Export Mode toggle button to switch between Image or Video export mode. Export Settings will update when new media is loaded to match the input media. Use the ‘Lock Export Settings’ checkbox to preserve export settings when loading new input media.
- Format - Select video file format (MP4/WEBM/GIF) or image file format (PNG/JPG). We recommend using MP4 for large or long videos or WEBM if transparency is required. GIF format is good for short small loops and produces very large files at low quality.
- Size - Select pixel size. Input media will be scaled to fit the export size. Pixel size is the main factor for export render time and performance. Try reducing export size for faster exports. Check ‘Maintain Aspect Ratio’ to preserve input media aspect ratio.
- Duration - If export duration is longer than input duration, video input will be looped. If export duration is shorter than input duration, export video will be trimmed from the start. (Video output mode only)
- Frame Rate - Frames per second. Higher values increase smoothness but produce larger files. (Video output mode only)
- Quality - We recommend using the default quality (High) for optimal quality and file size. (MP4 and WEBM only)
- Trim Input - Trim Input allows you to trim the input video by setting start and end times. Note that setting these options will override the export duration option to match. If you want a trimmed input to loop you can set the export duration after trimming. This option only shows when loading video.
- Lock Export Settings - Check this to preserve export settings when loading new input media.
General Settings
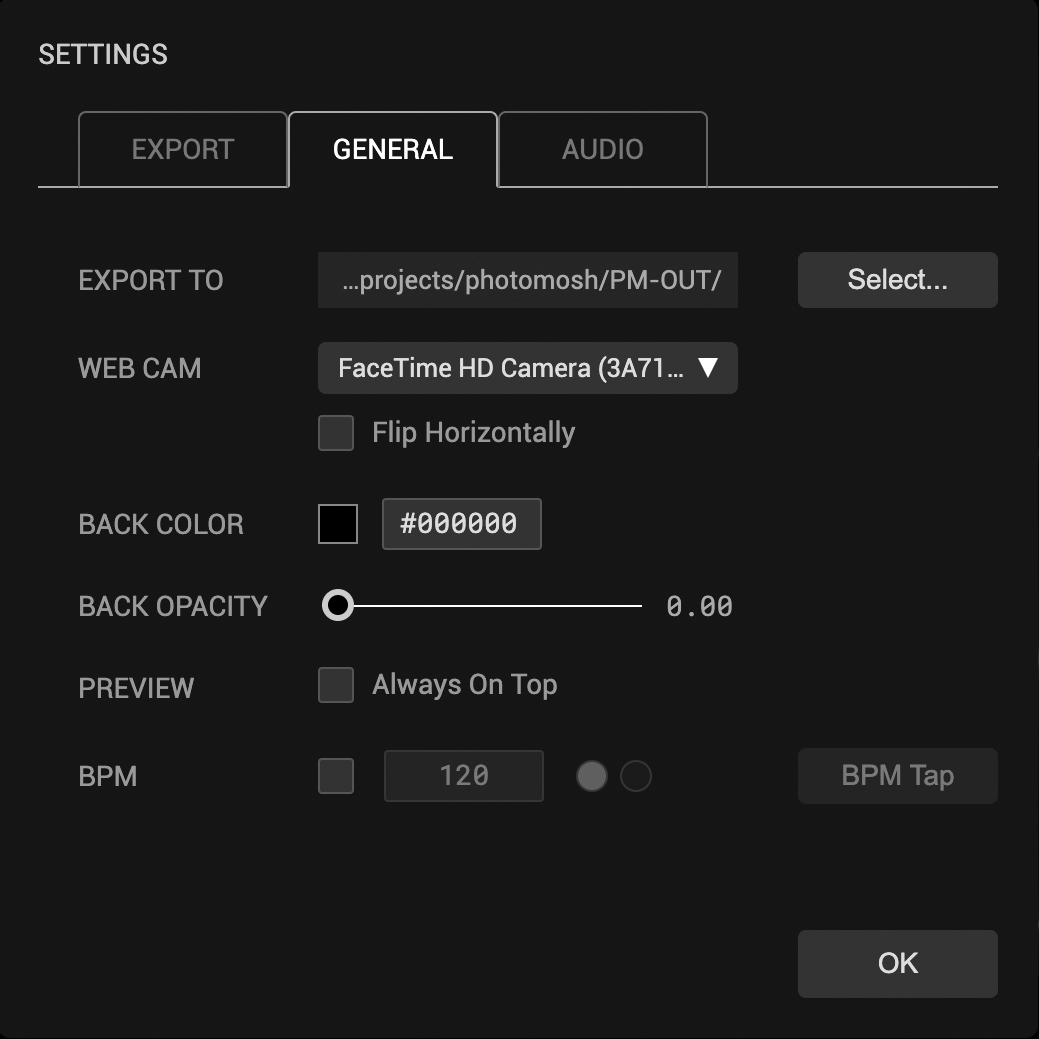
General settings allow you to specify app-wide settings and are retained during the current session.
- Export To - Select folder to save exports to.
- Webcam - Select Webcam used by Webcam mode. For Webcam mode, use Main Menu -> File -> Use Webcam
- Back Color - Select Hex color value for the background. This color is used when input media or effects have transparency.
- Back Opacity - Select background opacity. Set to 0 to export media with a transparent background. Set to 1 to use the Back Color behind transparent media. For MP4 and JPG output, this is locked to 1 since those file formats do not support transparency. Transparent background is represented by a checkerboard pattern.
- Preview - Check the ‘Always On Top’ option to force the Pop Out Preview window to always be on top of other windows.
- Fonts - Click the ‘Add Fonts…’ button to add custom fonts to the app. TTF and OTF font files supported. Fonts are copied into the Mosh-Pro app support folder. Added fonts will be avaiable in the Caption effect font selector.
- BPM - Check to use BPM timing for effect modulator loop times. This can be used to match modulator times to music BPM (see ‘Modulators’ below). Type in the BPM value, or use the ‘BPM Tap’ button to set BPM by tapping to the beat.
- Encoding - Check ‘Use GPU Encoding’ to utilize hardware GPU for encoding MP4 videos. This will increase export speed by up to 50%. Note that GPU encoded files may be larger and have more compression artifacts. GPU Encode option will only show if a hardware GPU is found on your device.
- Spout / Syphon - Check ‘Send to Spout/Syphon’ to output realtime video to Spout or Syphon. See ‘Spout / Syphon Output’ below for more details.
Audio Settings
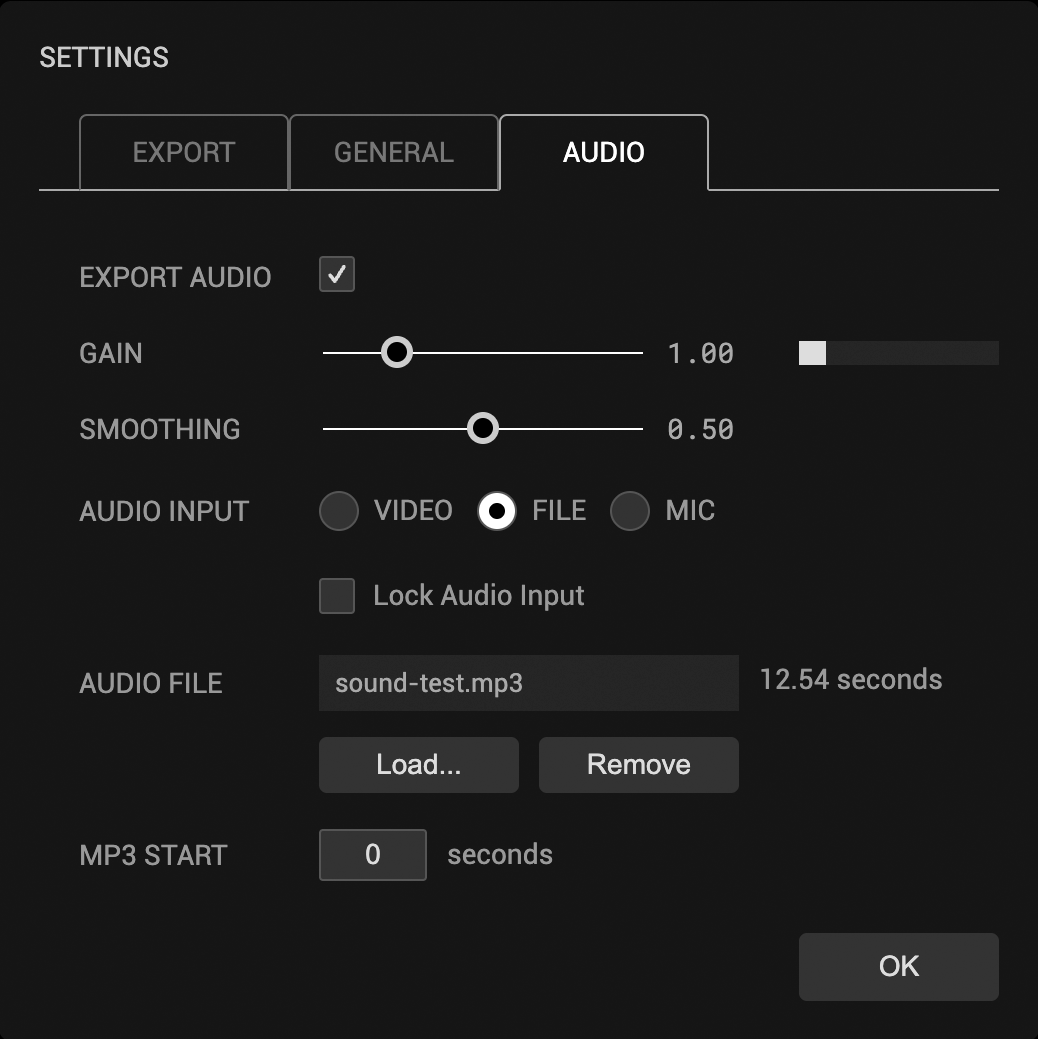
The audio settings tab will only appear for MP4 and WEBM export modes.
- Export Audio - Whether to export audio.
- Gain - Use the ‘Gain’ slider and the volume meter to modify how input volume affects the audio modulators. (See ‘Audio Modulators’ below)
- Smoothing - Controls volume level smoothness for audio modulators. Higher smoothing will give slower changes over time. Lower smoothing will give faster, more jumpy animations.
- Reduce Noise - Check this to reduce noise for Audio Analysis in quiet signals while preserving dynamics in louder signals.
- Audio Input - Mosh-Pro can take 3 different audio inputs which will be used for audio export and to drive the audio modulators.
- VIDEO - Select ‘Video’ to use the input video’s audio track. For inputs without audio, this option will switch to ‘NONE’
- FILE - Select an external audio file (MP3 or WAV) to override the input video audio and be used by the audio modulators. Use ‘MP3 Start’ time in combination with video export duration to create an audio loop.
- MIC - Use the Webcam mic to record live audio. Select from multiple device mics. When this option is selected the main ‘Export’ button becomes a ‘Record’ button and will record live audio until the ‘Stop’ button is pressed.
- Check ‘Lock Audio Input’ to retain the current Audio input when importing new media.
Modulators

Modulators allow you to modify Effects parameters over time. This is a great way to get more variety into your video loops. Modulators are only enabled for video output mode. Click the modulator (sine wave) button to enable modulator and open the modulator drawer.
- Type - Select from the following options:
- Linear - Linearly changing value over time range.
- Sine - Smooth change with a sine wave shape. Good for looping back to the original value.
- Bounce - Quick onset and slow decay. Good for bouncing effects.
- Step - Jumps between Min and Max values over time.
- Noise - Smoothly varying randomized value. Noise will loop within the time range.
- Rand - Discrete random variations, more jumpy than noise.
- Const - Uses the max value as a constant value. Useful for using with Chance, Start and End.
- Audio - See ‘Audio Modulators’ below.
- Midi - See ‘MIDI Modulators’ below.
- Keys - See ‘Keyframe Modulators’ below.
- Speed - Speed of modulation within time range. Uncheck the ‘Loop’ checkbox to allow slower speeds.
- Loop - Check this to ensure effects loop seamlessly. Uncheck this to change effects slowly over the entire video duration (see ‘Modulator Speed’ below).
- Min - Minimum possible value. Used as a factor to multiply the output value.
- Max - Maximum possible value. Used as a factor to multiply the output value.
- Chance - Chance that parameter value will randomly drop out to zero over time range. Good for toggling effects randomly over time.
- Start - Start time as a factor of export duration. Effect value will be zero outside the start/end time window.
- End - End time as a factor of export duration. Effect value will be zero outside the start/end time window.
- Right click the modulator icon to copy/paste modulator data between effect parameters.
- Select a numeric input to change value with scroll wheel or mouse drag.
Modulator Speed
Modulator speeds can use 3 different times scales:
- When ‘Loop’ is checked modulators will seamlessly loop within the ‘Loop Time’ which is around 4 seconds, based on the export duration.
- When ‘Loop’ is unchecked modulators will loop within the entire export duration. This allows slower speeds. With ‘Loop’ unchecked you can type in any speed between 0.01 and 8.
- When ‘BPM’ is checked in Settings -> General, the loop time will sync to the BPM timing.
Audio Modulators
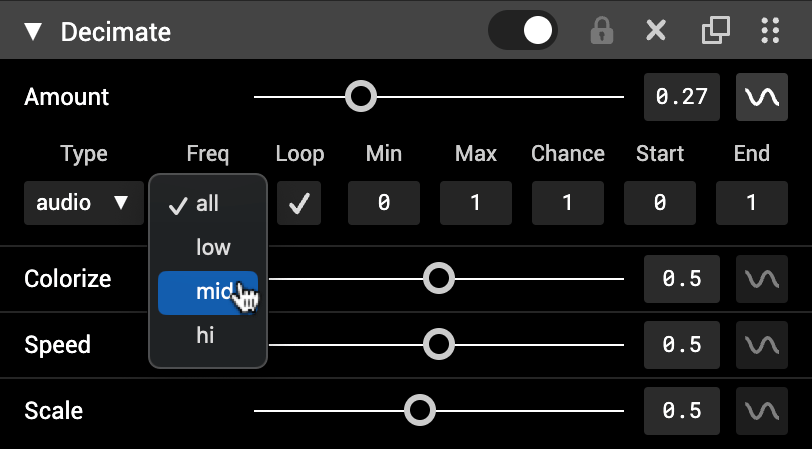
Audio modulators are a great way to generate audio-reactive videos. Use the volume of the audio input to modulate parameters.
- Use ‘Freq’ to select frequency range to allow separate motion for bass, melody or hi-hats.
- Use Settings -> Audio -> Gain and Smoothing to control global input volume and smoothing.
MIDI Modulators

MIDI Modulators allow you to use a MIDI controller device or DAW to control effect parameters.
- To connect a MIDI input, click the ‘Learn’ button then move a slider or press a key on your MIDI controller. The ‘CC’ display will change to a number representing the incoming MIDI CC event number.
- CC events from knobs or sliders will be mapped to the parameters value range. Note values from keyboards will use the velocity of the note as the value.
- MIDI modulators currently only work in Live mode and will not be recorded for export. To record or stream live moshing we recommend using OBS.
- To use MIDI input from internal software MIDI sources such as a DAW, you may need to route the MIDI out from the DAW back into the computer in order for Mosh-Pro to receive it. For MIDI routing on Mac, you can use the built in MacOS app: Audio MIDI Setup.
- To test if your MIDI Device can been seen by Mosh-Pro use this MIDI Test webpage
Keyframe Modulators
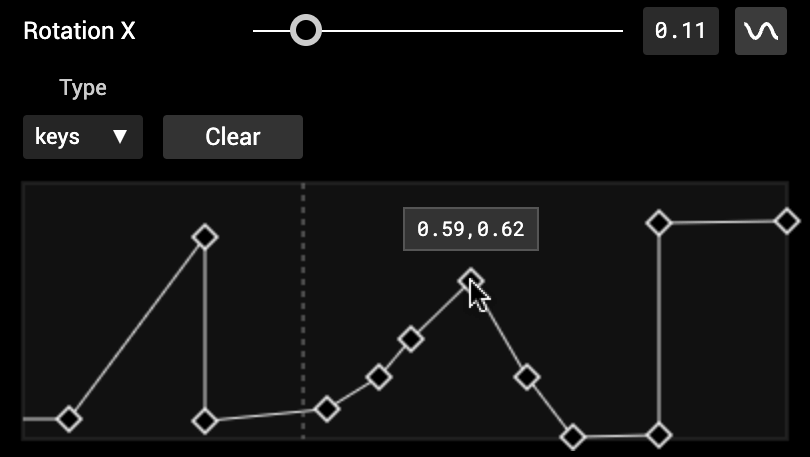
Keyframe Modulators let you specify exact times and values for a parameter to change. This is useful for creating precise animations.
- Left click to add a keyframe.
- Click and drag a keyframe to move it.
- Right click to remove a keyframe.
- Use ‘Clear’ button to remove all keframes.
- The dotted line indicates the current playback time.
- Click ‘Expand’ button to display the full size keyframe editor window overlay. This allows better precision for complex keyframes.
Batch Export

Batch export allows you to apply the currently enabled effects to multiple files (images or videos).
- To do a batch export, From the Main Menu select ‘File’ -> ‘Batch Export…’.
- To retain export settings (such as export size) across the batch, check the ‘Lock Export Settings’ checkbox in Settings -> Export. Export settings (e.g. image size) will match the current export settings unless ‘Match Input’ is selected in the export settings, in which case the source file settings will be used for that value.
Pop Out Preview
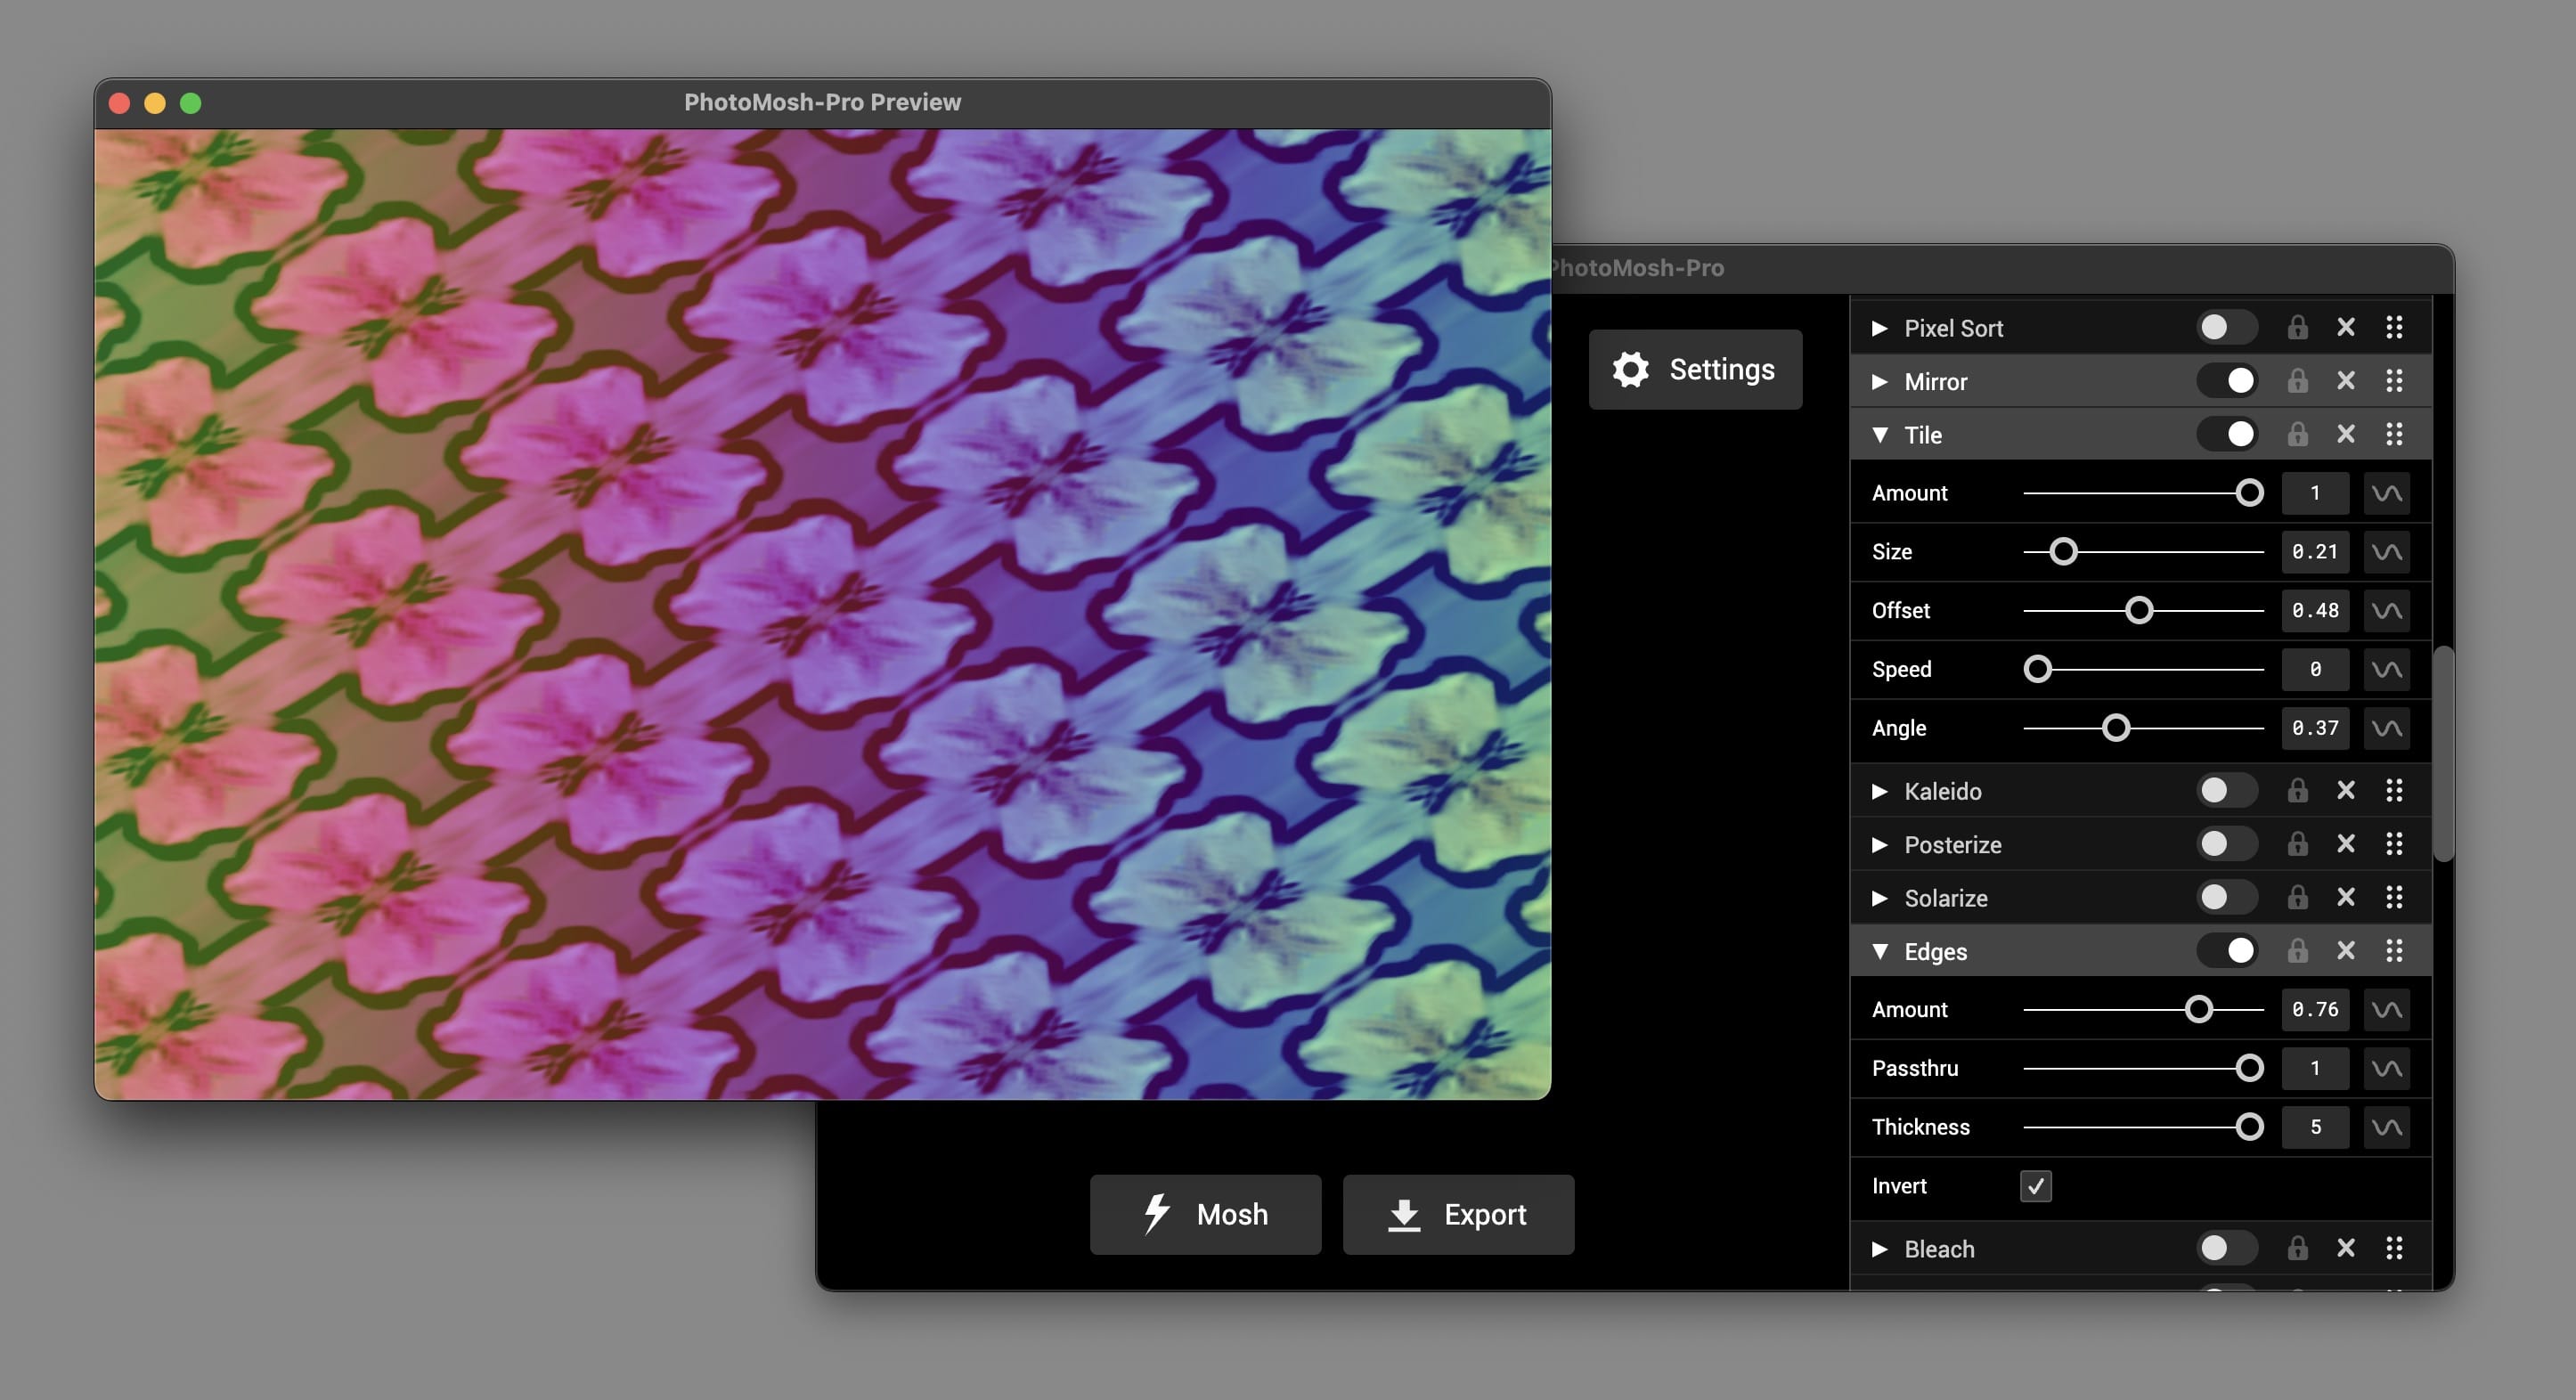
Pop Out Preview moves Mosh-Pro output to a separate window. This is useful to display output on a second monitor for sending to a projector, or for live recording via OBS or similar.
- Use Main Menu -> File -> Pop Out Preview. The Pop Out Preview window size will match the export dimensions, and can be resized or maximized.
- On Windows, use the right-click window menu to maximize and restore the window.
- To set whether the Pop Out Preview is always on top, use the Settings -> General -> Preview ‘Always on Top’ checkbox.
Spout / Syphon Output

Mosh-Pro can output video with zero latency via Spout (Windows) or Syphon (macOS). This allows you to use Mosh-Pro as a live video source for VJ software and streaming applications such as Resolume, VDMX, MadMapper, TouchDesigner and OBS (with Spout/Syphon plugin).
Spout (Windows)
Spout is a real-time video sharing framework for Windows. Enable Spout output to share Mosh-Pro’s video output with other Spout-compatible applications.
- To enable Spout, check Settings -> General -> Send to Spout.
- The Spout output will match the current export resolution and FPS.
- Receiving applications will see Mosh-Pro as an available Spout source.
- Note: Export width will be rounded to the nearest 32px size.
Syphon (macOS)
Syphon is a real-time video sharing framework for macOS. Enable Syphon output to share Mosh-Pro’s video output with other Syphon-compatible applications.
- To enable Syphon, check Settings -> General -> Send to Syphon.
- The Syphon output will match the current export resolution and FPS.
- Receiving applications will see Mosh-Pro as an available Syphon server.
- Note: Syphon client must be started before Mosh-Pro.
Keyboard Shortcuts
Keyboard Shortcuts can be viewed from the application main menu. For MacOS use Cmd key, for Windows use Ctrl key.
- Cmd-O - Load File
- Cmd-W - Use Webcam
- Cmd-S - Save
- Cmd-P - Toggle Pop Out Preview window
- Cmd-M - Mosh Effects
- Cmd-Z - Undo Mosh
- Cmd-D - Disable All Effects
- Cmd-E - Randomize Effects Order
- Cmd-Cursor Right - Next Preset
- Cmd-Cursor Left - Previous Preset
- Cmd-R - Load random preset.
- Cmd-# - Where # is a number from 1 to 9. Load preset by order in preset list.
- Cmd-, - Open Settings
- Cmd-U - Update preset
- Spacebar - Play/pause preview playback